A Step-by-Step Guide to C-Section Scar Massage Using Cups
Shauna Ironside is an osteopathic manual therapist, certified athletic therapist, athlete, and mother of three. She has a busy clinical practice in Ottawa, Canada, where she has been helping bodies of all ages and stages lead pain-free, healthy, strong, and active lives for the past twenty years. Learn more about Shauna here.
Recovering from a C-section is a journey that involves patience, self-care, and understanding your body’s needs. One tool that can help in your recovery is cupping therapy. While cupping is often associated with relieving muscle tension and improving circulation, it can also play a crucial role in managing scar tissue after a C-section. This guide will show you how to safely and effectively perform C-section massage with cups in the comfort of your home.
Why Cupping for C-Section Recovery?
Cupping therapy offers several benefits for C-section recovery:
Improves Circulation: Encourages blood flow to the scar area, aiding in healing.
Breaks Up Adhesions: Helps loosen scar tissue and adhesions that may limit mobility.
Reduces Tightness: Promotes skin and fascial mobility, reducing discomfort.
Supports Nerve Healing: Stimulates the area to promote sensation and reduce numbness.
When to Start Cupping Massage
Always consult with your healthcare provider before beginning any postpartum recovery techniques.
Typically, you can start gentle cupping massage around 6-8 weeks postpartum if your incision has fully healed, and you have no signs of infection or complications.
What You’ll Need
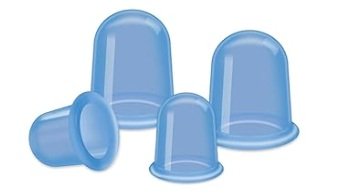
Silicone Cupping Cups: These are flexible and ideal for gentle massage.
These are the best cups. Don’t buy the flatter cups, you want some height to it to hold onto and a curved edge for glide. These come in a multi-size pack, but the medium one is the one you want to use for your scar.
Lubricant: Use a gentle, unscented oil or lotion to help the cups glide smoothly over your skin. I like Palmer’s Cocoa Butter. It should have some greasiness to it.
Clean Hands and Equipment: Ensure everything is clean to avoid introducing bacteria to the area.
Step-by-Step Instructions
Prepare the Area:
Wash your hands thoroughly.
Clean the area around your scar with warm water and a gentle cleanser.
Apply a light layer of lubricant to your skin.
Choose the Right Cup Size:
Start with a smaller cup for more control. Silicone cups are typically easier to manipulate.
Apply the Cup:
Squeeze the cup gently to create a vacuum and place it just above or below the scar. Avoid placing it directly on the scar initially.
Monitor Your Comfort:
For all strokes and maneuvers start by working above and below the scar. When you feel comfortable progress to working directly on the scar. Older scars should be worked on directly, right away.
Start with light suction and increase over time. You should feel a gentle pull, but no pain. Adjust the suction if it’s too intense.
Suggested Cupping Protocol for C-section Scars:
Aim to spend a minute to two on each different stroke. This means that a full cupping session should take approximately 5-10 minutes.
Parallel Gliding: create comfortable suction and glide back and forth above, below and directly on the scar.
Perpendicular Gliding: suction at the scar or just above it, then pull upwards (towards your head). Work all the way across the lower abdomen.
Gliding + Twists: Twist the cup in both directions as you glide it parallel to the scar and on it.
Static Wiggles: Create a strong suction and without gliding the cup wiggle it 10-20 times up and down, left and right, and in a twisting motion. Repeat along the scar or in especially sticky areas of scar tension.
Finish with Parallel Glides: perform a series of light suction parallel strokes once again.
Tips for Success
Go Slow: Start with short sessions (5-10 minutes) and gradually increase as your comfort and tolerance improve.
Stay Consistent: Aim to perform cupping massage 3-4 times per week for the best results. Reduce to 1-2 times per week as suppleness improves.
Listen to Your Body: If you experience pain, discomfort, or redness that doesn’t resolve quickly, stop and consult a healthcare provider.
When to Seek Professional Help
While at-home cupping can be effective, consider seeking help from a physical therapist or other postpartum recovery specialist if:
You’re unsure about technique or placement.
You have significant scar sensitivity or adhesions.
You notice unusual swelling, redness, or changes in your scar.
C-section recovery takes time, but incorporating cupping massage into your routine can be a powerful way to support your healing. Remember, every journey is unique, so be patient with yourself and celebrate every step forward. If you’re ever in doubt, reach out to a postpartum health specialist to guide you.
For more tips on postpartum recovery, explore our resources or schedule a consultation today!


