
THE BEST 5 EXERCISES TO DO IN THE FIRST MONTH POSTPARTUM
Before you jump into these exercises, read about why I encourage my patients to start rebuilding postpartum before their six-week check-up (discharge) from their primary care provider HERE. Introducing rehab exercises and movement patterns as soon as you are feeling up for it is recommended by countless obstetrical and midwifery associations and colleges, including The Canadian Society for Exercise Physiology, The Society of Obstetricians and Gynecologists of Canada, The American College of Obstetricians and Gynecologists.
I strongly encourage you to seek the guidance of a professional women’s health specialist very soon after birth to help you rebuild optimally, safely, and effectively. If this is not available to you or you want more postpartum strength exercises, I have an 8-week postpartum rebuilding program. You can access it here: The Postpartum reBUILD.

Regardless of the kind of birth you had (vaginal or surgical), reconnecting to the muscles that were under the most amount of strain and stress during pregnancy and birth makes a whole lot of sense: your pelvic floor muscles (PFM) and abdominal muscles.
Together these make up the bulk of your CORE. While your core is truly your entire trunk, we often call the abdominal area the core for simplicity's sake.
These muscles make up your foundation — muscles that are critical for all movement, organ support, breathing and alignment.
** learn more about your CORE.
Before we jump into the exercises, here are some frequently asked questions.
When can I start these exercises postpartum?
You can start these exercises immediately postpartum. Yes, immediately. Like in your hospital bed or at home in bed.
You may not want to, and that is fine! And I’m pretty sure these exercises will be the last thing on your mind in the first day or two postpartum, but please know that you can. I think this is an important thing to keep in mind. You can. You can. You can!
You also may not be able to because of epidural, meds, trauma or other interventions that affect your ability to do them with full sensation and/or without pain (more on this below).
But know that as soon as you can or are ready to get started, you can!
If you read my post on why you shouldn’t wait for the six-week mark to start rebuilding, you’ll know that exercises like the ones below are important for promoting healing. Light exercise is also important for improving your mood, mental wellness, sleep, and energy - all things that are usually pretty depleted in the first six-weeks (six years!) postpartum.
What if I experience pain with an exercise?
Things are sore and swollen after birth and can be downright painful - sometimes for weeks. The tissues have been stretched and in some cases injured.
It is therefore common to have pain when you contract (tense) or even relax these muscles and tissues in these early days or weeks. If you do experience pain with any exercise (or daily task), I suggest that you stop and try it again with a slight change to your focus, your posture, or your breath. If the pain presents again, stop, and try again the next day.
How often should I do these exercises?
I suggest you do them once a day. More if they feel great! Or less if you just aren’t up for it.
These exercises are about reconnecting and rebuilding in the very early days >> weeks after birth, so go at your own pace. Remember, there is no recipe and it is certainly not a race.
How do I progress exercises postpartum?
The five exercises below are listed in a progressive order. You should start with the first one: gentle Piston Breathing. It is foundational and should be applied to the other four exercises, and even all exercises.
Progress once you feel you have gotten a good handle on the exercise that you are working on. You should feel like it is easy, that you can connect to the muscles that you are working on really well, and that your alignment is maintained and is optimal for the movement or load.
And if at any time you are not sure of your abilities, please, please, please see a professional who specializes in postpartum women’s health.
Keep these rules in mind as your progress:
No pain. No exercise of any kind, at any time in your life should give you pain, anywhere. Discomfort maybe, but no pain!
No increase in lochia or bleeding. No exercise should increase your lochia (postpartum bleeding). Just like when you have your period, a change in position might cause a momentary little increasese, but no exercise should increase the flow (just like with your period). If you do experience an increased flow, you should call your doctor or midwife asap.
No leaking. No exercise of any kind, at any time in your life should cause you to leak. See a pelvic floor physio if you are leaking beyond 3-4 weeks postpartum.
No undue pelvic floor pressure. No exercise of any kind, at any time in your life should cause undue pressure on your pelvic floor. A feeling of downward pressure, or worse, a bulge with any exercise or daily task should be brought to a pelvic floor physio.

GETTING STARTED
After pregnancy and birth reconnecting to the muscles of your core, including your pelvic floor muscles, is where you want to start - the muscles that were most stretched and strained.
These muscles help to regulate your internal pressures, but they are also affected by your internal pressures.
Have I lost you?!
Let’s talk briefly about internal pressures.
I’ll try to keep this pretty simple. If you want more, I’ll send you my thesis.
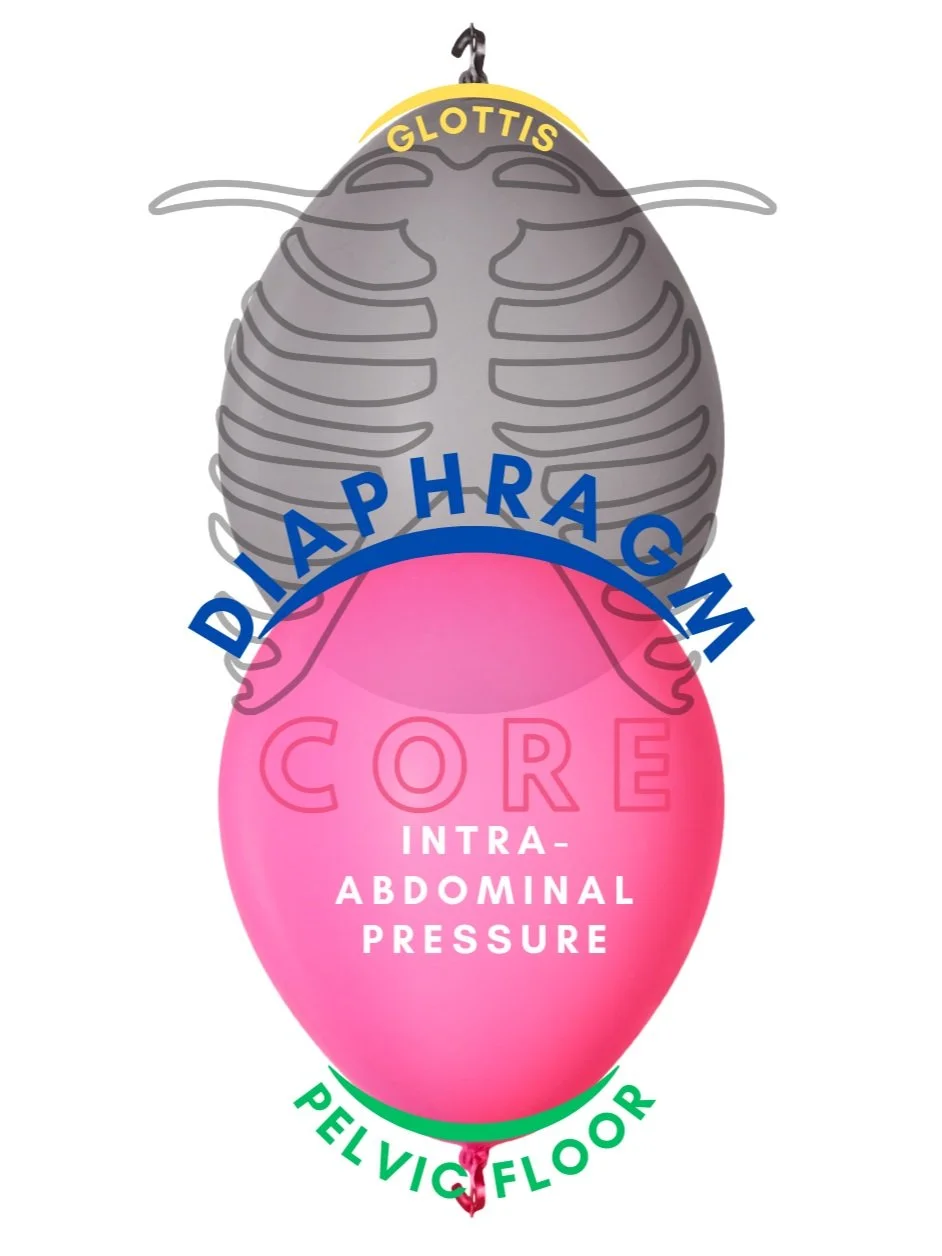
You may have come across these words: Internal Abdominal Pressure (IAP) - they are a bit buzzy these days, especially around the topic of diastasis recti abdominis (read more about that here).
The internal pressures of your thorax (chest) and abdominopelvic cavities are greatly regulated by the container walls that, well, contain them. The container is all of the muscle, connective tissue, and bones that make up the walls of your trunk, like a canister. The muscles of your pelvic floor span the floor of the canister. Your breathing diaphragm is the piston halfway along and at the top of the canister is your glottis (considered the main valve from your mouth to your lungs).
Another analogy that we often use for the IAP is one of a balloon. Except really it should be two balloons stacked on top of each other - one for the intra-thoracic (chest) pressure and one for the intra-abdominopelvic pressure (IAP).
So where does the internal pressure come from?
Air in your lungs is the obvious answer for the intra-thoracic pressure (along with fluid dynamics).
Pressure in your abdominopelvic cavity can come from fluid dynamics, muscle tensions, gas and bloating, cysts, fibroids, and a growing baby to name a few!
These two pressurized cavities affect each other.
Internal pressures are important as they have an impact on just about every system of your body: respiration, cardiovascular, digestive, lymphatic, urogenital, neurological, and biomechanical.
Our internal pressures fluctuate. They are typically low when we are lying down or in a restful state. They automatically increase when you stand up, cough or sneeze, or perform a loading task (ie lifting a baby, moving from sit to stand). They also increase with bloating, pregnancy, constipation, swelling, infection, increased blood pressure, and fluid retention to name a few.
For pregnant and postpartum women, pressure regulation is especially important for tissue protection and healing, continence, and pelvic organ support. When pressure within (internal abdominal pressure) is not well regulated (by the container tension and/or breath) we risk dysfunction like diastasis recti, incontinence, instability in the pelvis or spine, digestive issues, pain, reflux, and so on.
Learning to regulate your internal pressures.
IAP is not a bad thing. It is actually a vital part of your body systems, but too much, too little, or “misplaced” pressure can cause dysfunction, from reflux to incontinence.
There are many different strategies for regulating your internal pressures.
Simply put, you can voluntarily change your IAP by altering
1. your breath
2. the tension of the container (your core + pelvic floor muscles)
3. your alignment.
A lot of pressure regulation comes with practice. Knowing when to dial up your core tone, when to dial it down, when to use an inhale or an exhale, when to adjust your alignment. It takes time and practice.
Exercise #1 below (Piston Breathing) is a simple deep breathing exercise that will help you to re-establish and strengthen the connection to your core and muscles of your pelvic floor. This concept of dialing up the tone in these muscles while using your breath is foundational to pressure regulation. It’s certainly not all that you need to know, but it is, in my opinion, the best place to start.
You’ll apply the Piston Breathing concept to all of the other exercises here and I even encourage you to use it with your daily loading tasks like lifting laundry baskets, your baby, rolling in bed, moving from sitting to standing. But more on that later.
EXERCISE #1: PISTON BREATHING
Reconnecting to your breath, core, and pelvic floor.
This exercise is intended to help you reconnect with your core and pelvic floor muscles - the muscles likely feeling the most “lost” postpartum. It is a gentle exercise that uses the ebb and flow of your breath cycle to help you re-establish that vital connection with your deep inner unit: the muscles of your core and pelvic floor. You can read more about the core and how it should work along with your pelvic floor here.
These muscles are vital in your ability to regulate your pressures (see above) and they make up the foundation (the platform) for all movement.
I call this exercise Piston Breathing, but really it’s just good, physiological, deep breathing with a little extra focus on your core and/or PFMs. These are muscles that are working automatically for you right now (I promise!), but focused, conscious work on them will only make them work better since they’ve been pretty stretched and strained.
This exercise is the foundation for all of the other exercises here. Learn it well and come back to it often.
Goals:
Reconnect to proper breathing (which gets really “chesty” during pregnancy)
Reconnect to PFMs and deep CORE muscles (which get really “stretchy” during pregnancy)
When: you can do this anytime after birth.
Position: Start this one lying down - you can keep your feet flat on the bed or floor, or prop them on pillows or a chair. When you are feeling up for it, try it in quadruped (all 4’s), tall sitting, and standing.
Align Yourself: If you are doing this lying on a bed, use a big pillow or two under your knees. If you have progressed to quadruped, sitting, or standing, make sure your spine and pelvis are neutral.
Try This: Add a pillow under your pelvis to raise your hips up if you are still swollen or have a pelvic organ prolapse - use gravity to your advantage!
Do It:
Whether you are doing this in lying, sitting or standing make sure that your spine and pelvis are nice and neutral (maintaining your natural spinal curves) and that your lower ribs are not flared out.
Take this one SLOW and GENTLE at first (like all of these exercises). You do not want to increase your internal pressures so that they cause undue strain or pain on your PFMs, pelvic organs or healing scars. You are never pushing out or bearing down!
INHALE: let your diaphragm move down into your belly; your chest, ribs, belly and pelvic floor expand in 3-D without any pushing on your part - just a natural expansion from your inhale. Like a balloon filling your chest and abdomen.
EXHALE:
with pelvic floor focus: lightly and slowly while you draw your pelvic floor up (lifting) and forward - focus on the anus as your starting point and feel it draw "closed" in the direction of your pubic bone, like a zipper, lifting upwards into your pelvis. Keep your jaw relaxed. Some women like to exhale through the nose and others the mouth - do what feels best for you. You can vary the intensity of your contraction here:
light contraction (“zip the clit” is often a helpful cue)
strong contraction (“imagine drawing a marble up into your vagina”).
with core focus: engage your deep core muscles thinking of the contraction wrapping around from your back to your front in a hug. Your lower ribs should lower gently, thinking of a line connecting them to your pelvis and one side to the other. You can vary the intensity of your contraction here:
light contraction (think of blowing up a balloon)
strong contraction (think of a small child coming at you with their elbow aimed for your belly - brace!)
combine it: on the first part of your exhale draw your pelvic floor up, followed by your core muscles as above.
REPEAT: follow the ebb and flow of your deep breaths for a count of 10 or more.
Try to:
use your hands to feel your expansion as you inhale and your core connection as you exhale
make sure that your glutes stay relaxed.
make sure your shoulders, neck and jaw stay relaxed.
When to move on:
when you feel that you have a good deep inhalation + a good connection to your PFMs and core on your exhale
try it in quadruped (on all 4’s), sitting, and standing.
EXERCISE #2: APPLIED PISTON BREATHING
“PRE-CONNECT” WITH DAILY TASKS
Once you’ve reconnected to the muscles of your pelvic floor (PFMs) and core in lying, sitting and standing (exercise #1), now is a great time to think about these muscles with your daily tasks…when you can! These muscles work automatically with movement and daily tasks, but after pregnancy (or injury) they can get a bit “lazy” and some focused, conscious connection to them right before a task (“pre-connect”) is a great way to help them re-establish that automatic control.
Goals: Reconnect to core (+ PFMs) with daily tasks.
When: you can do this anytime after birth.
Align Yourself: you can play with alignment here! Generally, the more “neutral” your spine (slight curves) and pelvis, the better you’re connection to your PFMs and core will be, but not always. You might feel better slightly flexed or extended. The key is being aware of your postural tendencies and ask yourself why you are doing it that way, and how does it feel when you do it differently?
For example, when you lift the baby from a bassinet do you bend through your spine or do you hinge at your hips? How does it feel when you do the opposite?
Do It:
“PRE-CONNECT”: before a task (ie lifting baby from a bassinet) exhale to connect to your PFMs and core (as in exercise #1), hold the strength in these muscles, but don’t hold your breath. Hold the strength steady while you lift baby up.
How do you feel when you “pre-connect”?
Apply the “pre-engage” concept to your daily loading tasks:
Before you lift the baby.
Before you lift the diaper bag, car seat, or anything else!
Before you lift the laundry basket, groceries, stroller.
Before you lift your baby/toddler from their crib, highchair, the floor, the tub, etc.
Before you get out of bed.
Before you perform any movement that gives you an ache or pain.
Helpful tip: This is a simple concept, but can be hard to put into practice because we are usually just in a rush to do the task! Start by applying to it just 1-2 daily tasks (ie lifting baby from crib and going up the stairs).
EXERCISE #3. PISTON BREATHING + MARCHING
PROGRESSIVELY LOADING CORE
Once you feel reconnected to the muscles of your core and pelvic floor (exercise #1) you can start progressively loading them in low-load positions like supine lying and on all 4’s. The load here will come from your legs.
Goals: Introduce progressive load to the muscles of the core and pelvic floor.
Do it:
set yourself up in lying with your feet hip-width apart on the floor.
ensure that you move SLOWLY and with intention - you do not want to increase your internal pressures so that they cause undue strain or pain on your PFMs, pelvic organs, or healing scars.
INHALE: let your diaphragm move down into your belly; your chest, ribs, belly, and pelvic floor expand in 3-D without any pushing on your part - just a natural expansion from your inhale. Like a balloon filling your thorax and abdomen.
EXHALE: engage your core and PFMs as you did with exercise #1 (Piston Breathing) and hold while you lift and lower one leg from the floor. The start of your exhale is connecting to the core (and holding), while the second half is the leg movement.
REPEAT: follow the ebb and flow of your deep breaths, alternating leg marching with each exhale.
Try to:
minimize any pelvic motion when you lift and lower your leg - strong core.
get your hands involved to give you feedback about the quality of your core engagement and feeling for pelvic movement.
Progress it:
hold the connection to your core from an exhale steadily as you march the legs - you are still breathing, but you aren’t fully releasing the core engagement on the inhale.
extend the leg - instead of a march movement (short level), reach the leg out to tap the heel to the floor (long lever)
EXERCISE #4. QUADRUPED CORE W/ BALL
This is a great exercise that will progressively load your core and pelvic floor muscles. You’ll need an exercise ball (any size) or a peanut ball. If you don’t have one, an alternative would be Bird-Dog - start with just arms reaching, then progress to legs only, and eventually both arms and legs together.
This exercise takes your spine off the floor (like in exercise #3) so you have to do the work to keep it neutral and strong - it looks easy, but it is a challenge when done well!
Goals: Progressively rebuild the muscles of the core and pelvic floor.
Do It:
set yourself up on all 4’s with a nice neutral spine - not arched, not completely flat. Your gaze should be just in front of your hand position. Have the ball behind you, and against a wall or sturdy object. The ball should just be touching your bottom, essentially filling the space between you and the wall, nothing more.
INHALE: let your diaphragm move down into your belly allowing your chest, ribs, belly, and pelvic floor to expand in 3-D without any pushing on your part - just a natural expansion from your inhale. Like a balloon filling your thorax and abdomen.
EXHALE: engage your core and PFMs as you did with exercise #1 (Piston Breathing) while simultaneously pushing your bottom gently into the ball - you should feel the need to work with your core increase. Remember to keep your spine and pelvis neutral (ie pelvis doesn’t tuck under, the lower back doesn’t arch)
INHALE: as you return to the start position.
REPEAT: follow the ebb and flow of your deep breaths X10-20
Progress It: add an arm reach out after you’ve engaged your core and pushed into the ball. Return your hand back to the floor, then release the core on your inhale.
Try to:
keep your spine neutral (natural curves) during the start position; during the exhale you can flatten the lower spine ever so slightly which may help you feel more abdominal strength.
EXERCISE #5 HIP (GLUTE) BRIDGE W/ ELASTIC OR BLOCK
GLUTE REBUILDING
Your glutes are prime stabilizers for your hips, pelvis, and spine, so it's important to reconnect with them and build their strength back as soon as you are up for it postpartum.
They also tend to disappear rapidly in those early postpartum months due to their connection with providing your babe with omegas (yes, omegas) - weird, I know! But rapid glute loss postpartum is a thing - if you want to know more about it and what you can do about it read my article on putting the junk back in your trunk.
Your glutes also tie into your pelvic floor muscles and act to dampen forces on your pelvic organs.
Goals: Progressively rebuild the glutes.
Do It:
lay on your back with your feet hip-width apart, feet flat on the floor.
you have a few options here, do what feels good!
for more glute work add a light loop elastic to your knees
for more groin and pelvic floor add a yoga block, small pillow or ball between your knees
for perineum inflammation/swelling/pressure or pelvic organ prolapse, elevate your feet on a chair or step to get gravity on your side (this one often feels really good postpartum)
INHALE: let your diaphragm move down into your belly allowing your chest, ribs, belly and pelvic floor to expand in 3-D without any pushing on your part - just a natural expansion from your inhale. Like a balloon filling your thorax and abdomen.
EXHALE: engage your core and PFMs as you did with exercise #1 (Piston Breathing) while simultaneously raising your hips off the floor and lowering back down to the floor.
try to keep a fairly neutral spine, but if your tendency is to arch in the lower back you might benefit from tucking your tail bone under a bit, flattening your lower back slightly before you lift, holding it tucked throughout.
REPEAT: follow the ebb and flow of your deep breaths X10-20
Progress It:
Engage your core and PFMs with the Piston Breathing and hold it strong while STILL BREATHING and then perform the exercise - essentially you aren’t fully relaxing on an inhale at the bottom (as in the video below).
Perform a leg extension at the top of the lift (to put you in a single-leg bridge), bring it back, then lower.
Perform single-leg hip raises.
Add weight (like a dumbbell) or elastic to your pelvis for added resistence.
MOVING BEYOND THESE EXERCISES…
If you have progressed through these exercises and feel ready to move beyond them (yay!), consider the following:
Revisit Piston Breathing often. This is an exercise that can be used as a prep-exercise before more dynamic ones or a workout. Breathwork is a valuable tool for efficiently building at any stage of life. Come back to it often and in various positions.
Use your breath. Use your breath. Use your breath. Whether you are resuming more dynamic strength exercises or simply performing mundane daily tasks, I encourage you to tap into your breath to establish a good foundation, this is especially true when the load increases - the greater the load, the more you should utilize your breathing system. Your breath is the best, easiest way to connect to your deep core unit (including PFMs).
Respect the healing process that has to happen in the first six to eight weeks and the remodeling and rebuilding that can take up to a year. Your body has been under more physical stress and strain over the ten months of pregnancy and birth than it likely ever has before. Healing and rebuilding will take time. Patience is key.
Progressively load. While healing and rebuilding take time, remember that all tissues need load to remodel, rebuild and grow. If you hit a plateau consider trying a different exercise, changing the load, changing the volume, etc.
Work with a trained women’s health professional. Getting a proper assessment and an individualized plan for healing and rebuilding (at any stage) is a huge help. I always suggest that women see a pelvic floor physio at least once postpartum (usually at 4-6 weeks). Additionally, working with someone who will help with exercise progressions (any time PP) is additionally beneficial. If you are looking to return to a specific sport at an intense or elite level or return to competition, seeking the guidance of a trained professional is crucial. I’m happy to help: shauna@healthymumma.com.
A FEW OTHER THINGS TO KEEP IN MIND AS YOU WORK ON REBUILDING POSTPARTUM…
Remember that it can take 8-12 months (or easily more!) to rebuild postpartum.
Hormone levels are likely still high/low, especially if you are breastfeeding, and this can affect both your stability and ability to rebuild. Be patient and be smart with your exercise choices.
My suggestion for this time is to continue rebuilding those foundational muscles: the muscles of your core, including your pelvic floor muscles and glutes.
If time and energy are low (and it will be!) aim to at least target these areas 4-5x/week, for 10-15 minutes. It doesn’t have to be a full-on, sweaty workout to be effective! Work the muscles efficiently with good alignment, breathwork, and adequate load and you will see and feel the results that you are looking for.
A note about mobility postpartum.
Mobility is also really important at this stage. Your body has been under so much strain for nine months PLUS the strain of labour and birth, PLUS the strain of life with a new babe. I never imagined breastfeeding to be so straining. Neck, mid-back, wrists, shoulders - aches and tensions from poor, sustained postures.
Jump to my post on Breastfeeding Back(ache) for some great stretches and mobility exercises for postpartum. They are great whether you are nursing, bottle feeding, or just sore from life with baby.
Best of luck in your postpartum healing and progressive rebuilding!
